
How to Make a Bonsai Pinoy Style (Part 3)

So you picked the bonsai material that you’d like to work on and now have an idea of the basics. It’s time to get your hands dirty. In this chapter of How to Make a Bonsai Pinoy Style, Sir Nolan discusses a few general knowledge in developing an ordinary tree into bonsai. You may need to recall your artistic talent!
Chapter 3: DEVELOPING YOUR MATERIAL INTO A MINIATURE TREE OR BONSAI
By Nolan Sison
Q1: Now that my collected bonsai materials and commercial garden hardwoods and softwoods are growing wild, what should I do next?
A: The following sequence of branch selection is from the bottom of the tree…going upwards. Now it’s time to choose your 1st branch.
- Thickest lowest branch. Position it either on the right or left side of the tree. If that is done, now u have a front.
- Choose the 2nd branch either at the back or at the opposite side of the 1st branch but higher in position.
- Choose the 3rd branch… the remaining side without a branch…except the front side. (Repeat the whole process for upper branches if it’s formal upright style till you reach the apex.)
- Choose the front branch at a higher position than the 3rd branch.
- Now, your leader (trunk continuation) is the topmost thickest branch. This is only applicable to materials with cut trunks. And your apex is the 1st branch of the leader. (Variation of which is the leader’s 1st branch is the front branch, and the 2nd branch is the apex…for development or for clustering).
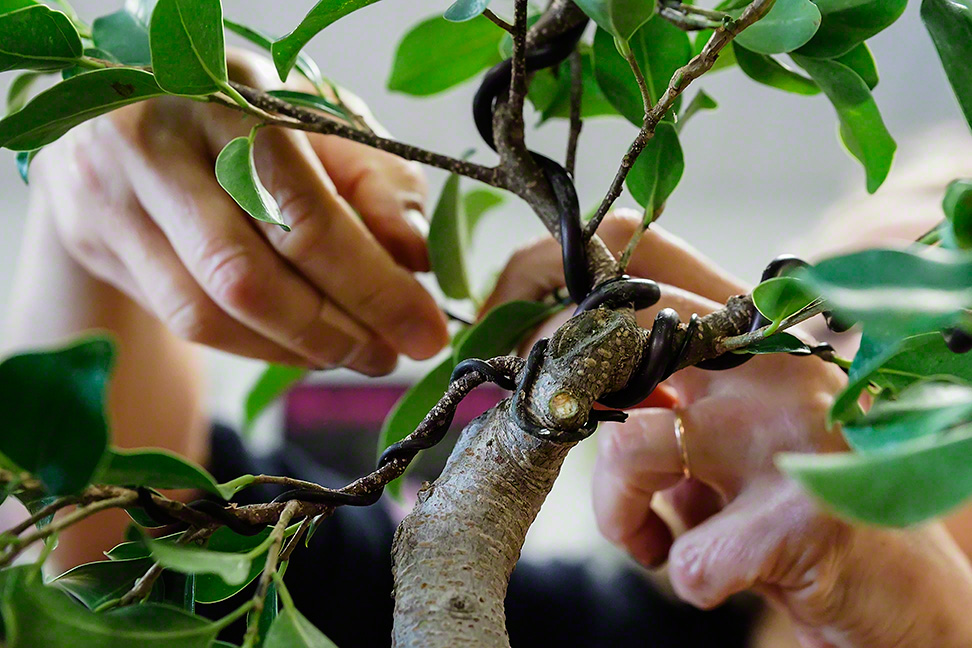
- All other branches emanating from the trunk… cut it off. When done, wire all branches bent at the X and Y axis… going in the general direction of the horizontal. All other retained branches should be similar in bent direction.
Now, cut back all primary branches taking the general shape of a triangle. Long at 1st branch, a little shorter at 2nd branch… and so on till shortest at apex twigs. Now, you have a shaped bonsai. If you already have secondary branches, retain the 1-2-3 branching or left-right-left or vice versa in every primary branch. Repeat this for tertiary and 4th, and 5th generation branches. If this is done, wait for branch thickening and ramifications (succeeding generations of branches and twigs) until you have a well-balanced, proportional, show-ready bonsai. Good luck.
Q2: What if the desired branches are not in their ideal position or placement? What if the trunk did not give me those 1st, 2nd and 3rd branch ideal placements? What should I do?
A: Then, do the freestyle technique. First, retain a single branch from all twins and triplet branches. Choose the thickest branch. Then, choose the front. The front should reveal the best features of the trunk and has nebari or show thick root appendages from the trunk. After choosing the front, wire all remaining branches and follow bending procedures, ramifications and cut-backs as discussed in
Q3: What are the considerations in choosing the front side of my bonsai?
A: For single-trunked upright trees, choose the front where it shows:
a. the most evident taper or A-shaped lines of the trunk;
b. the first branch is at the left or right side of the tree;
c. the most number of nebari or root appendages;
d. no eye-poker or branch or jin pointing at the viewer;
e. the most number of features – shari (deadwood on the trunk), jins (deadwood branches), dragon-scaled barks, trunk curves and twists, etc.
f. no wounds and scars or hiding the bad features (placement of unsightly imperfections at the back of the tree).
Q4: I have chosen my front, I have wired my branches, and I have cut all unneeded branches. What’s next?
A: Now is the time for branch thickening and regular pruning. All trees have apical dominance or the topmost branches have more robust growth than the lower branches. To prevent the 1st and 2nd branches from being left out of the thickening period, regularly trim the apex and upper branches except for the 1st and 2nd branches. The overgrowth will make the lower branches thicken faster than the upper ones. If the 2nd branch is growing faster than the 1st… Trim or cut back the 2nd branch retaining only the 1st branch as the wild branch.
Q5: Are there techniques on how to make the branch thickening process faster?
A: There are many ways on shortening the time period of thickening and ramifications of branches:
- Plant your bonsai direct in the soil. Your medium will become unlimited and soil has better moisture retention than in pots.
- Apply complete fertilizers. I must warn you though that over-application of fertilizers will kill your bonsai. To be safe, I recommend that you use only the SLOW RELEASE complete fertilizers.
- Do the sacrifice branch technique. An unwanted secondary branch, if wired upright, will grow taller than the apex of your bonsai. This will suck in the nutrients which will thicken the primary at a faster rate. If the desired thickness is achieved, cut off the sacrifice branch. NOTE: Choose the sacrifice branch growing from the back side of the primary. This way, if you cut it off, the wound or scar won’t be visible to the viewer.
- Do the double and triple tray technique. You will notice that there are roots sticking out of the drain hole of your potted bonsai. Get a new pot, fill it with river sand and soak it with water. Then, put your potted bonsai on top of the potted river sand. The roots sticking out of the drain hole will “taste” the new medium under it and will grow more roots at the second tier. If you see more roots at the base of the 2nd potting medium, it’s time to make a third one…putting it under the 2nd pot. This way, we are expanding the nutrition-gathering room of your bonsai for more robust growth. If your bonsai is show ready, just lift its pot, cut the connecting roots to the 2nd tray/pot under it, and you will have a healthy-looking bonsai tree.
- Apply rooting hormone. There are several brands available in the market such as Anaa and Hormex. These hormones if diluted in water and used in watering your trees, will encourage faster growth and development for your bonsais.
Q6: I noticed that some of my bonsais’ leaves are turning yellow. Should I get alarmed?
A: Yes and no. You should get alarmed if the yellowing leaves are at the tips of the branches and twigs. This is a signal that your roots are in distress and dying for several reasons:
a. Clogged drain holes.
Water that can’t flow through the drain holes is soaking and rotting the roots. Re-pot ASAP.
b. Drying roots.
Your pot’s drain hole is so big that every time you water your bonsai, river sand, and soil flow out with the water, creating a big air pocket t the bottom of your medium which is not visible to you. Your fine roots (soil nutrient absorbers) are drying and dying. Re-pot ASAP, using a fine-meshed screen to cover your pot’s big drain hole.
c. Fungal infection.
The damp condition of your soil is ideal for fungal growth. Fungi grow inside your pot and it is eating your roots slowly for its nourishment. Re-pot ASAP with new river sand. Throw away your old river sand.
d. Over fertilizer.
Too much fertilizer or nitrogen overwhelms the roots and gets “burned”. Re-pot ASAP with new river sand and throw away your toxic old medium.
e. Lack of moisture.
You did not water your bonsai properly. It might be wet at the surface but water is not enough to seep into the lower roots which are your fine, absorbent roots. Submerge your bonsai in a basin of water for 24 hours and after that, devise a routine of watering your bonsai thoroughly… until you see the water coming out of the pot’s drain hole. Always have a barbeque stick nearby for your routine soil moisture test. After watering your bonsai, push the BBQ stick on the pot’s soil as deep as you can. Pull out the stick and hold its bottom tip. If it’s wet, you did well. If it’s dry, you did a lousy watering job. Water your bonsais again.
f. Acidic soil.
Because of the various types of fertilizers, we apply (even if sparingly), and the quality of our water source (chlorinated), your soil’s Ph level rises gradually over time, becoming acidic. Re-pot ASAP using new river sand, and throw away your acidic medium. Or… submerge your potted bonsai in a basin of water for 24 hours, changing the basin’s water every 4 hours to dilute the acidity.
g. Root-bound bonsai.
Your tree has grown in that small pot for many years and you might have not noticed that the pot is now 90% roots and 10% soil. Soak your pot with water, hold the trunk and pull it up. If the tree came out of the pot as a whole, with its roots shaped like the pot, then your bonsai is root-bound. Soak the roots in a basin of water, shaking them off to loosen all the trapped soil. Run your fingers through the roots like a comb, to separate all intertwined appendages. Cut-off all thick roots and retain the finer ones. (Thick roots are for anchoring while fine roots are for absorbing nutrients). Put in a new medium (river sand or soil or a combination of both) and re-pot your bonsai.
If the yellowing of leaves are appearing at the base of branches:
a. Lack of nutrients.
Making your bonsai wild has reached its maximum and the tree can no longer sustain the nutritional requirements of many long branches. Cut back, defoliate, and cut off all unneeded branches, except the branch needing more thickening, and your bonsai will resume its robust growth.
b. Nothing to worry about.
This is normal for some tree species, especially during the months of October, November, and December (autumn and winter). They shed off old leaves, become dormant, and grow new leaves in spring (March).
Q7: While waiting for my bonsais to thicken its branches, what should I do?
A: The branch thickening process will take years. You might get bored when you wait for the 2nd wiring, 3rd wiring and styling. Go ahead and acquire more bonsai materials. Or better, go and get semi-finished materials so you will get busy on re-styling, re-wiring, and re-potting.
Q8: How do I choose the right pots for my bonsais?
A: Now, this is a very tricky topic as pot choices are sometimes very subjective from the owners’ point of view. So the following discussion on the right pot choices is just mere SUGGESTIONS or GUIDELINES for you to make a more intelligent choice.
First, you have to determine if your bonsai is MALE or FEMALE. How is that? Male bonsais have muscles (undulating trunk texture), abrupt twists of branches, wide trunks, and a general impression of masculinity. On the other hand, female bonsais are slender, with graceful sway of body and branches, smooth bark surface, and a general impression of femininity.
After determining the “sex”
After determining the “sex” of your bonsai, the guideline is: Male bonsai pots have corners: square, rectangle, octagon, and variations of such. On the other hand, female bonsai pots should have no corners. Round and oval pots are ideal for female trees.
Pot depth: The width of your trunk should be the depth of your pot. If the width of your tree trunk is 3-in., then your pot depth should also be 3-in.
Pot width: The width of the pot should be 2/3 of the width of the tree. Measure the treewidth from the leftmost branch tip to the rightmost branch tip. Get 2/3 of that and that is your ideal pot width.
Pot color
Your pot is a representation of the place where the tree is growing. Trees from the mountains and plains should have earth-colored pots. Earth colors are Brown, black, dark red, orange, and dark gray. But, there are trees that grow in a watery environment or those that can be found in marshlands, beaches, and riverbanks. These trees should be potted in water-colored pots. The color of the water is white, cream, light blue, light gray, and light brown.
Glazed
Bonsais with flowers and/or fruits should have glossy or glazed pots.
Pots with other primary colors: red, green, blue, and yellow pots are used as a contrast to the real colors of the tree. A bonsai with red leaves (Ficus coccina, maturing leaves turn brown) might create confusion if a reddish or brown pot is used. So ideal pot colors for red-leafed bonsais are green, blue, or yellow.
REMEMBER: YOUR POT SHOULD NEVER ATTRACT ATTENTION AWAY FROM THE TREE.
The simpler the design of your pot, the better. You are showing the tree, not the pot.
EXCEPTIONS: cascades, literati, forest, and land/seascape penjings should not follow these guidelines.
Q9: I see some displays in bonsai that show that some bonsais have a tiny pot beside it with grass plantings. Why is that?
A: This is one of the Japanese traditions showing what grows under or beside the tree. The tiny pot is a representation of what other plants are growing around the tree.
Q10: What is the wisdom of buying bonsai materials as against buying semi-finished bonsai and show-ready bonsai?
A: When we buy bonsais, we are not buying the small tree per se. What we are really buying is the TIME. We pay premiums for finished and semi-finished bonsais because we don’t have to spend years caring for and styling the tree before it gets developed. We pay cheaply for new materials because we still have to spend time for ICU, branch selection, wiring, branch thickening, and styling, and that is 5 years minimum (except for small, shohin and mame materials).
So it is your choice. Cheap but undeveloped or expensive but fully developed bonsai. For beginners, I encourage going to the path of the least expensive way. Start caring and nurturing bonsai materials and learn the tricks as you go on with the hobby. Show-ready bonsais are for collectors who don’t have the time for developing their own trees but have lots of money to buy the time they can do away with.
Q11: I want to buy ready and semi-ready bonsai. But I don’t know if I am bursting or not. How much really do these finished bonsais cost?
A: Standard bonsai valuation: # of days in pot x P5/day = base value. Plus premium on uniqueness and complete, proportional branching sequence and style. Ex: if a one-year-old small bonsai (in engr cecilio’s bonsai pic above)… if is one year in the pot.. 365 x P5 = P1, 825 is the base value. Premium (now, this is the subjective part) is not so much because it has only 1 branch at left and its leader is not defined.. The canopy hole in the middle has no peeping back branch, but a little more re-styling and it will be show-ready.
Premium is P500 only. So the real value of that bonsai is P2,325. Therefore, unstyled, unwired, wild bonsai materials have zero premiums. The bonsai pricing formula should not be applied to materials from commercial gardens. These “potensais” should be priced the same as other ornamental plants on display. I hope everyone will learn something from this standardized pricing scheme especially the sellers and first-time buyers.


